


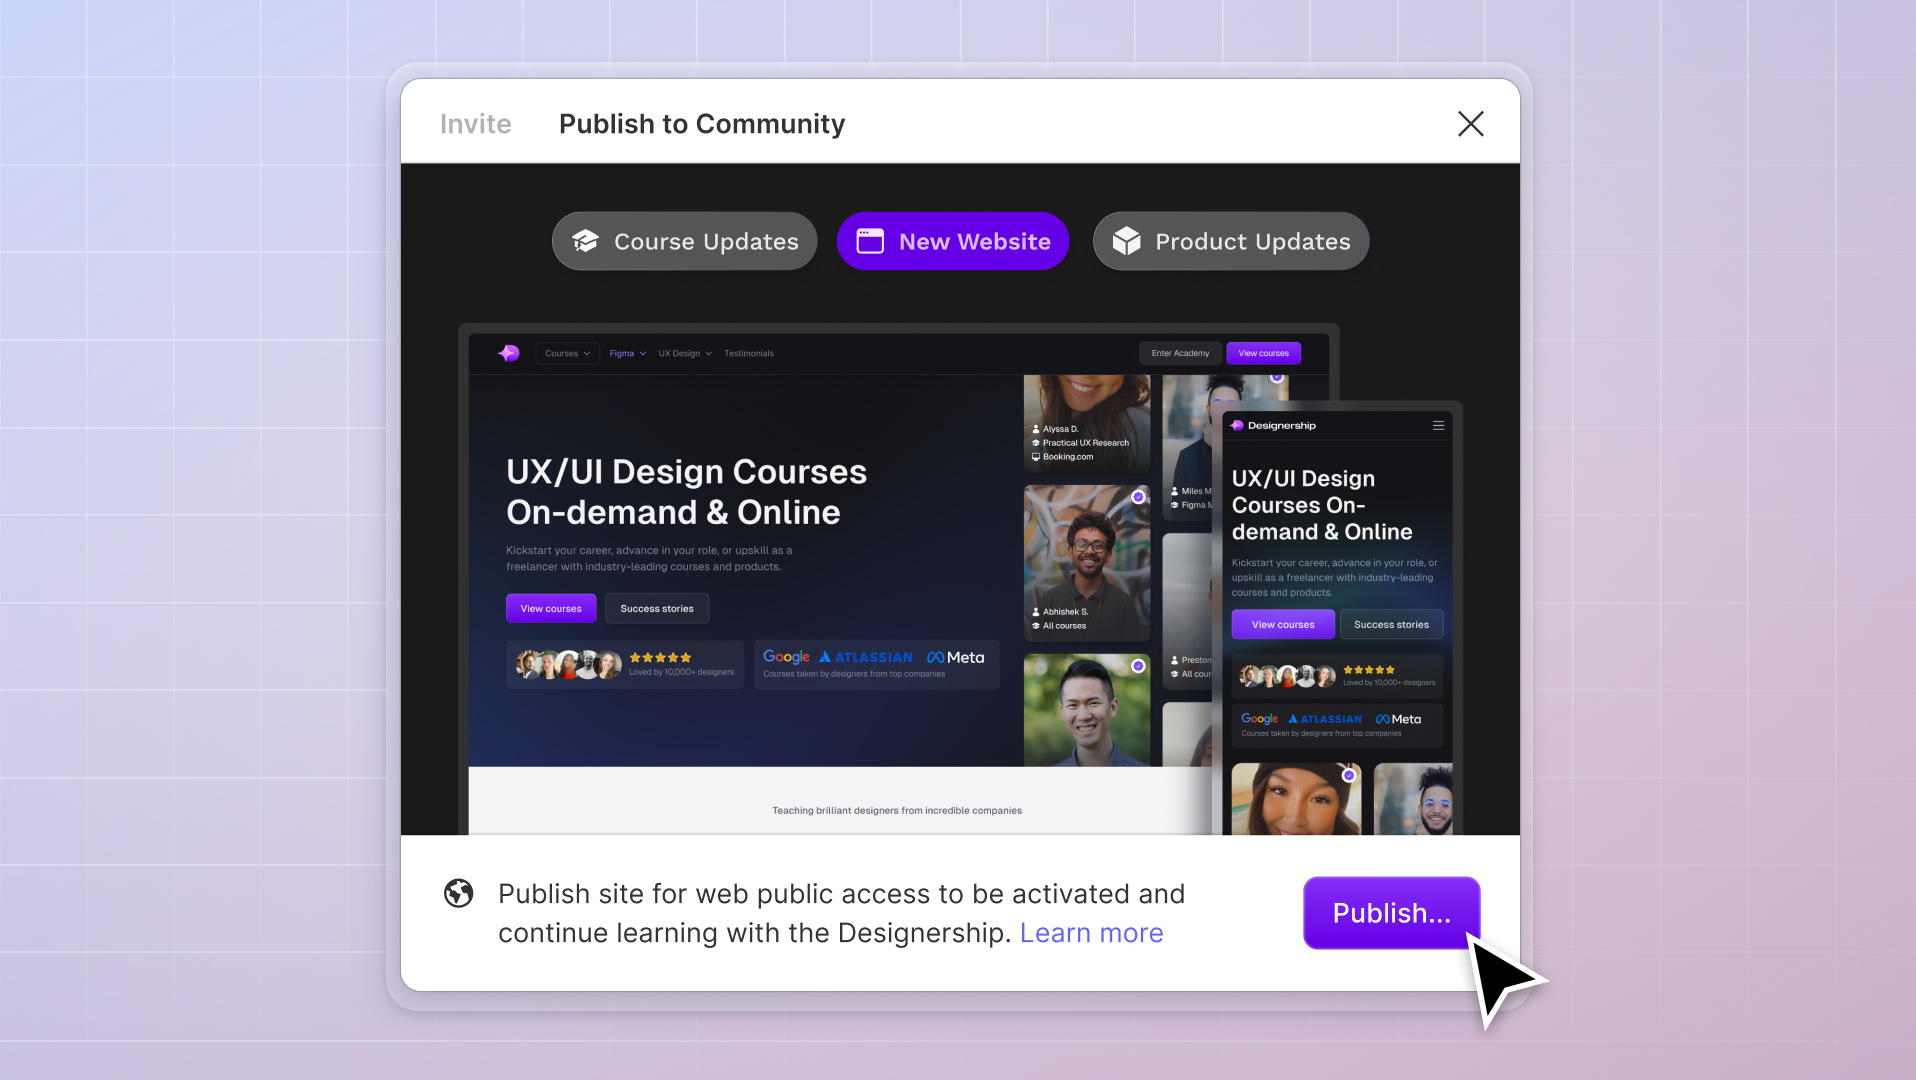
What's New
New website, course and product updates - April 2024
A lot happened this month. Take a look at what's coming.
Michael Wong
Apr 17, 2024
·
7 min read


Figma is the definitive interface design tool for UI and UX designers.
If you’re new to Figma, here’s what you need to know:
Figma is your one-stop shop for collaboration, prototyping, and building design systems. So here’s what you need to know to use Figma like a boss in 20 minutes’ time. The clock starts now.
(By the way, you also can also follow along with the video that accompanies this guide here.)

If you haven’t already, sign up for an account on Figma. Signing up is free and because you can sign up through Google, it’s pretty painless.
Now, I don’t want to throw you to the wolves. It can be pretty overwhelming to get started on a completely new tool, especially one as powerful as Figma.
After we go through our beginner-friendly tutorial, I recommend you continue experimenting with pre-made Figma files.
And guess what? Figma has just introduced “Figma Community.” It’s currently in beta, but it contains thousands of files that you can view, pick apart, and remix. This will give you hands-on experience with Figma. Check out Community by clicking on the link in the left-hand menu bar.
Figma makes it easy for you to organize your projects by team. Teams can be used like folders.
In any file within the “Shared Projects” section, you can collaborate in real time with others.
In our example, we’ve created two teams in addition to Shared Projects. These teams are Clients and Personal. By creating these two teams, we can organize our projects by type (which is a great idea if you work in an agency by moonlight as a freelancer).
Set up basic teams (or folders) that you’ll be creating projects for. For example, create three teams, one for agency work, one for freelance, and one for tests.
Once you select the “team” (or folder) you’d like to work within, click on the + button on the upper right side of the screen. That creates a new project.
Note: As a brand new user, you’ll be prompted to choose a template. For this tutorial, go with the blank canvas option. But feel free to play around with these templates as you familiarize yourself with Figma.
One of Figma’s multiple benefits is its intuitiveness. Even as a complete beginner, you won’t be completely lost with Figma. The flow and menu items make sense.
But I want to call your attention to one thing: The Save Local Copy option. You can find this by going to the hamburger menu on the upper left corner, going to file, and choosing “Save local copy…” from the expanded menu.
You can then download your Figma file as a local copy and send it to your clients. Your client can then upload the file to their Figma account (which, of course, is free for them).
While you can simply send your clients a link to the live project, that raises other issues, especially when you’re working as a freelancer. You’ll have to pay for your client’s membership every month so that they can access it. That’s not ideal when you have the option to send them the raw source file just as easily.
Frames (aka art boards) are standard on Figma. If you’ve already worked with frames in a different tool, you’ll find the process to be simple in Figma.
You can access Frames from the top menu bar or you can press “F” on your keyboard.
Notice immediately on the right hand menu that you have multiple starter templates to work from.
Next to the Frames option on the top menu is the Shapes option. Learn the shortcuts.
Hover and click on the nodes to rotate, create pie charts, and round corners.
Next up, we have the pen tool. No doubt you’ve used the pen tool before (and hated it?).
The Hand tool lets you quickly navigate around your workspace. You can either click on the hand icon from the top menu, press “H” on your keyboard, or use the spacebar to temporarily activate the move tool.
Click on the Comments icon (or “C” on your keyboard) to activate comments. You can then click on an element in your design and leave a message for your team or client. Figma automatically notifies them of the comment.
And then the comment disappears from view. But it’s not really gone. While still in Comment mode, you can see all comments in the right hand menu.
If the comment has been resolved, you can still see it by going to All from the right hand menu and clicking on “Show Resolved Comments.”
The Left menu is where you’ll access all of your frames and your layers.
CMD + D on your keyboard duplicates frames.
Next to layers is the Assets menu. Assets is where you manage all of your components and your design systems.
When you first start out, this section will be empty. But as you gain more experience as a designer and start developing your systems, you’ll definitely fill this area.
For example, you may create your own button and save it to your components library. Then, you can access your button for any subsequent project that you work on.
In upcoming tutorials, we’ll go in depth on how to create assets. But for now, we’re just taking a high level overview of Figma so you feel comfortable using it.
Now, let’s take a look at the right menu.
First, you can see your initial in a circle icon. This profile icon, of course, represents you. If someone else was working on this same file, you’d be able to click on their circle icon and then see the actual view that they are in.
This is useful for collaborating with another designer. You can do that by click on the blue “Share” button next to your profile icon.
However, if you’re working with a client, I wouldn’t advise giving them access to this view.
Instead, click on the Present icon (next to the blue “Share” button).
Then, in the new window, click on “Share prototype.”
This way, I can control what the client sees. They won’t see all of the unfinished ideas that I’m still fleshing out.
The next level of menu options include Design, Prototype, and Inspect.
Design and Prototype may be all that you need as a designer, but if you’re a developer (or simply enjoy writing code), you’ll get some use out of the Inspect feature. They provide CSS, iOS, and Android component styles that you can grab really quickly.
Figma also makes it easy for you to create an auto layout of your shapes. This allows you to evenly space out your shapes. We’ll deep dive into this useful feature in a later tutorial. However, it’s worth playing around with now just to see how it works.
Select two or more shapes and then click on Auto Layout option in the right menu. (Alternatively, you can press Shift and A on your keyboard).
Once your shapes are aligned through Auto Layout, you’ll see a double bar on the left menu that indicates that the shapes are grouped together.
After clicking on the shape group, you have a lot more options in the right menu. You can adjust the space, the padding, the direction, and so on.
Figma allows you to set up constraints. Constraints make it easy to develop responsive components in your design. Instead of manually scaling and manipulating each of your designs so that they don’t look stretched or wonky on different screens, you can use Figma constraints.
Here’s how to do it:
First, create a shape within a frame or component.
Grab that component and then on the left menu, set your constraints.
The main component is called the parent frame and elements inside are called the child object.
You can then drag the components to change the size and view the object from different screen sizes. This allows you to create quick responsive templates within Figma.
To access the layout grid, be sure to click on the frame (you can either click on the frame’s name in your work area or click on the frame under the Layers menu on the left.
Now, on the right menu, you’ll see the option to click Layout Grid. From here, you can change the size, color, and transparency of your grid. You can also select the drop down arrow next to Grid to switch it to columns or rows.
Next, we have Fill. You can fill any object by clicking on it and then going to the right right menu and scrolling down to Fill. Next, select or enter the color that you’d like to use. You can then choose between six types of fills, including solid, linear, radial, etc. (This is accessible from the color window.)
You can layer multiple fill colors by clicking on the plus (+) button next to fill.
Creating stroke lines around your shapes is also pretty straight-forward in Sigma. Click on the object and then find Stroke from the right menu. Next, change color, opacity, size, and position of the stroke. You can create dashes or round corners.
Figma Effects allow you to bring your vectors to life. You can add shadows (both inner and drop) as well as blur (both layer and background).
Finally, once you’re done and excited about your design, you can export it.
To do that, scroll to the bottom of the right hand menu (be sure that you’ve selected the shape that you’d like to export).
Select the size of the object and the file type (png, jpg, svg, or pdf), and click on Export and you’re ready to use and share the asset.
Figma is undefeated. It’s one of the best design tools for UI, UX, and web design. Figma is truly a one-stop destination. And the fact that it’s free for individual users makes Figma a no-brainer.
Mizko, also known as Michael Wong, brings a 14-year track record as a Founder, Educator, Investor, and Designer. His career evolved from lead designer to freelancer, and ultimately to the owner of a successful agency, generating over $10M in revenue from Product (UX/UI) Design, Web Design, and No-code Development. His leadership at the agency contributed to the strategy and design for over 50 high-growth startups, aiding them in raising a combined total of over $400M+ in venture capital.
Notable projects include: Autotrader (Acquired. by eBay), PhoneWagon (Acquired by CallRails), Spaceship ($1B in managed funds), Archistar ($15M+ raised) and many more.


.jpg)


%20(1)%20(1).jpg)